Pages

Friday, April 26, 2013

For a Grandmother's Shower

Hi Everyone,
Well I have been a little busy.  Last Thursday, Friday and Saturday, I was off giving classes. Sunday, I put all the supplies away and then I got started on making this cute little "brag" book for my best friend, Linda.

I was invited to a grandmother's shower for her, yesterday at a friends home. I don't know about you, but I'd never heard of  a grandmother's shower before. It's a shower for the grandmother, giving her baby gifts that she keeps at her home for when the baby comes to her house to visit. How cool is that.

Well I am not a mom, don't have grand kids nor do I have children, and  here I am off to shop for gifts for the shower. Wrong thing for me to do. LOL.  I bought a loads of things!! LOL. I bought things that were on the mother's registry and I figured Linda could use them at her house as well. Linda thought I bought out the store. LOL

Since this is Linda's first grandchild,  I wanted to make her a little "brag book". So I put together a cute little book that she can write notes in and add pic's. I think this turned out so cute.


Six pages (pockets) and 2  tags to each pocket that open up to allow room for pic's and places to jot down things to remember, etc. I used stickers to adorn the fronts of each pocket. Found some great baby themed patterned card stock paper from Echo Park Paper Co.It's a 6"X 6" paper pad and its called Bundle of Joy.
It is dar-ling!!! The baby is due the first week in June and he is going to be named Jackson. So, I used blues, greens and yellows. I also used lots of ribbon even though the baby is a boy. LOL

Well, I sure hope you enjoyed this darling little tag book I put together.

Tomorrow is the last Saturday of the month and that means I will be at Stamping Buddies for the monthly make and take. I took the samples over to the store Monday, so I will have to take some pic's tomorrow at the store and share with you later.

Have a great weekend and I will be back soon.

x_3dcd3f33 photo x_3dcd3f33_zpsf7fd6331.gif

Sunday, April 14, 2013

Happy Spring

Hi Everyone,
Happy Sunday!!!. Thanks for stopping in today!! Hope you are having gorgeous weather today in your area. It's really pretty here in my area. I just noticed that my burning bushes in the back are starting to bud out.And  I am seeing lots of birds, so spring has finally arrived!! Hallelujah!!!!

On my last post, I made a card and used a cloud (part of the rainbow digi image) to make the icing on a cupcake. (Thinking outside the box.) Well, today, I have a card using the full digi image of the rainbow. The rainbow digi is courtesy of Back To Paper. Check out all the details over at Crafters Digital Art Center

I have a gorgeous embossing folder that I used for the corner and the full right side on this card. It includes butterflies and swirls. Two of my favorite things to add to a card.


Those clouds in the background, I made them using a template. Easy peasy. I flocked the clouds on the rainbow and used  glitter and a Permopaque pen on the swirls. I had fun making this and I think this is a great spring card, don't you.

Have a great day and I'll see you soon.


Saturday, April 13, 2013

Rainbows to Cupcakes

Hi Everyone,
Thanks for stopping in today. Today's card is made from image 2( or part of it) in the CDAC Progressive Freebie Challenges. This challenge runs April 1 - June 30. The image is courtesy of Back To Paper. Image 1 and the card I made can be viewed here

It's seems that lately I have been thinking, or maybe I should say seeing, outside the box. Lately, when I see an image I also see other ways to use the image, or part of it, in a different setting than it was intended for.

For instance, I received this image of a few clouds with a rainbow in between..


 OK, yes I saw the obvious, however, I wondered if the larger cloud could be used for...............

 icing on a cupcake????

Yep!!

I used the cloud for the icing, colored it and added glitter. I hand drew the cupcake base then penciled in and scored the lines for the cupcake paper folds and colored it. I made sure to leave a little of the cake part showing and colored that area a brownish color. That candle, well, its a piece of card stock rolled into a very small tube. Next I added glue oozing down the front it and let it dry. Then I colored the dried glue with a white pen. Used bakers twine for the wick and added a little black to the tip to make it look as if the candle had been lit.

I found a panel that had been punched and was patiently waiting to be used. Added a back to the panel, used some DP and printed the sentiment out from my computer. The cupcake has a soft bend in it to give a 3-d effect. So I was able to go from a cloud sans the rainbow, to a cupcake in short order. Bet you can too. LOL.

Next time you see a stamp or a digital image look closely, you may see another way to use it other than the obvious.

Have a great day,

x_3dbf78d1 photo x_3dbf78d1_zps3ae1d7e3.gif

Friday, April 12, 2013

On a Bicycle Built for Two

Hi Everyone
I just received a new  stamp set from Sparkle N Sprinkle and I am really excited to show it to you.
This is the new set: Set 494 Bicycles  (LOVE IT) See it here

Stamp Set 494 - Bicycles

Bicycles are such great images. 

I made a card that incorporated a handmade element and I thought you'd be interested in this card and how I made the tree..

This card was so fun to make. As I was putting the components together to make this card, I envisioned a tree over on one side. I had a doily on my table and as I was getting this card together I thought  the doily reminded me of the greenery of a tree. So that is how the tree came into being. That tree was so easy to make, so let me show you.how I did this.


Are you familiar with the Martha Stewart Circle Edge Punch?? Well this nifty tool will make a doily between 6" and12". 


So I made a 6" doily and I used a green designer paper 


Next I used a branch die.


I cut out 2 of the branches


And I positioned one over the other to look like a large branch jutting off the main tree trunk. 


 Next I trimmed off the excess and glued the 2 tree pieces together.


Now if you lay the tree trunk on top of the doily, its starting to look like a tree, isn't it.

The tree is sitting in the corner of the card so I cut off the excess of  doily. 


Next I attached the tree top (doily) to the corner of the card.


Attaching the trunk is really making that tree come alive.


 Slide the framed designer paper under the tree. 

Now I added some leaf clumps by using pieces I cut from the remaining piece of the doily. I cut 4-5 round pieces using the scalloped edges.


I used dimensional foam and placed these over the tips of the branch ends.


Using dimensional glue I added green Flower Soft.


Now the tree is finished.


I just added a bicycle to the card to make it appear that it is coming out of the picture and I added the sentiment to the top left. This was a fun card to make and I hope you liked it!!!


x_3dbeff26 photo x_3dbeff26_zpsf3ccbbe0.gif

Thursday, April 11, 2013

What makes you happy

Hi Everyone

Just a quick post to let you know that Sparkle N Sprinkle has introduced a new stamp set. Bicycles set 494. What a great new set it is!!!


I haven't made a masculine card for a while and thought this might fill the bill. 

Challenges I am entering:
Don't forget, stop back tomorrow for a cool card and see how I made the tree.See you then.


Wednesday, April 10, 2013

Poppies

Hi Everyone,
Boy what a wonderful day it is here in my area. Really warm and sunny. Pretty soon we will be cutting the grass.I am hoping cold weather is a thing of the past for this year.

Last nite was the monthly club meeting and I gave the tutorial. This tutorial was part 2 of working with microfine glitter. Last month, part one revolved around stamping on microfine glitter and then coloring it with markers, alcohol markers and using watercolors. They all seemed to really like that tutorial. This month, part 2, centered on using outline stickers and how to use different colored glitters to "color" in the various ares of the outline sticker. The outline sticker I chose to use has poppies on it. We just used 3 colors and the ladies had a great time learning this phase of using microfine glitter.

I made a boo boo on mine. Imagine that, the instructor makes a mistake. LOL. I noticed it after everyone had left. So, to minimize the appearance of the error, I used silver microfine glitter for the background, instead of leaving the dull silver on the background of the outline sticker.

I love this outline sticker, it is one of my favorites!!! Thought you'd like to see my completed.card.


I used a corner swirl from Heartfelt Creations to cut out the silver cs. I also embossed the black cs just to add a little interest to this card.

All of the glitter I used is from Sparkle N Sprinkle. Their glitter is known as Velvet Glitter and let me tell you, it is a wonderful microfine glitter, and it does feel like velvet. Their Velvet Glitter comes in 17 great colors. I used:

**Black Suede **Gypsy Red **Luau Green **Sonic Silver**

Check them out here

I am working on a  post and it has a lot of pics to show you how I made a tree. You will have to stop back to see this one.

I will have the post ready for your viewing pleasure on Friday. Please try to stop back then. See you soon.


Saturday, April 6, 2013

From Umbrellas to Butterflies

Hi Everyone
Welcome back.Are you a digital image user??? I really like them as I feel I can make them larger smaller and you can't do that with rubber stamps. Recently I received a free digital image from CDAC and decided to really think outside the box, so to speak.


Crafters Digital Art Center, CDAC, has a Progressive Digi Freebie Challenge  where you can get a free digi.  When you post a your creation, you can then send an email for the next freebie. This month there are 4 freebies you can receive if you are posting creations that you have made with each of them. This is the 1st image and I decided  to use thus image a little differently. I have to thank my friend Donna for showing different ways to use an umbrella a few years ago.

This really great umbrella image is from Nana Vic Digitals and it's a wonderful umbrella.However.......
I have used this opened umbrella and morphed it  into a butterfly. So every time I look at an umbrella I think of Donna and I see other things.


I cut the 2 of the umbrellas out, removed the handles and butted these next to each other at the top of the umbrella. I used pearls as the body and added some wire to make the antenna. Those open dots on the umbrella digital image, well I covered them with flat backed black pearls. I just thought that the yellow color and the black pearls just went so well together.

Don't let rain showers get in your way. Next time you see an open umbrella think of butterflies!!! LOL

Have a fabulous day!!


Wednesday, April 3, 2013

Anything But a Card Blog Hop

Hi Everyone,

Thanks for stopping in today.
 I am participating in two blog hops simultaneously, so if you are looking for the Craft-Dee BowZ Blog Hop please make sure to click here to be taken directly to the Craft-Dee Bowz blog hop. If you are looking for the Sparkle N Sprinkle Blog Hop, then you are in the right spot.


Are you having fun and getting inspired !!
If you came here from Cindy's blog then you are in the right place. If not and you want to be eligible for prizes please make sure to start at the Sparkle N Sprinkle Blog for all the details.Leaving a comment on each DT members blogs will make you eligible for a prize. Prizes to be awarded are: a grand prize (stamp set of your choice) and 3 hidden prizes on 3 different designers blogs. And we don't even know where the hidden prizes are.
Here is a list of the designers so you will not get lost.

** Shona Erlenborn ** Jackie Smith  ** Karalee Ingram  ** Dawn Bennett ** 

**Shanna** Anne Temple  ** Brigita Skopas ** Karin Martin **

**Cammy Vietzke ** April Williams** Cindy Keogh ** Barbara Bruder (that's me) **

**Julie Zippel ** Marie Berquist ** Brenda Smalle **  


Let me share with you my projects.
Since we are spotlighting Anything But a Card in our blog hop this month, I decided to focus on gifts. Adorning gift containers and using stamps to make everything coordinate is so easy and really a great accent to the gift itself. We all give gifts throughout the year, so these ideas can be used for whatever the reason for the gift.

First, we all use bags with handles from time to time. It seems that more often we use tissue paper to add a little pop and pizazz to the bag. Well how about using a bag topper instead. They are sometimes called a Bag Bib. Let me show you my decorated bag. I used a plain white handled gift bag, and covered the front and back with card stock and some designer paper to glam the bag up a bit. Next I decided on the theme and then decorated my bag topper. And I then decorated a box for another gift.

Here are my two coordinating projects:


Here is a close up of the bag topper

I used the mermaid from Stampette Set 477S to adorn the bag topper. Isn't she cute. 

other products used:
Embossing Powders: Pear EP 420 and Moss Star EP 430
Colored with colored pencils
Flat Backed pearls and Rhinestones
Small seashells

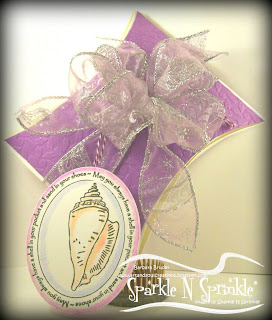
I also decorated a pillow box that can be used for a small gift. For everyone who likes to have things match or at least have the same theme, I continued with the sea theme.Since the pillow box was white I cut a shape to cover the top and bottom with purple cs, Next I used an embossing folder on the top cover and then I attached the purple covers.I added a ribbon and a fluffy bow. I decided that the gift was in need of a gift tag so I used an oval from Spellbinders, stamped the outside and added the verse to the inside. Added color inside and out, punched a hole and added twine I attached the gift tag to the bow.


Here is the gift tag opened with the sentiment.

Well it is so easy to coordinate gift packaging with stamped images. And this will give your gifts that coordinated look.

products used on the pillow box:
All stamped images on box - Stamp set 404 Ocean Treasures
Embossing folder
Colored pencils
Ribbon
Twine

Directions to both of my projects can be found below:
Gift Tag on Pillow Box
Gift Bag - Bag Topper

Now it's time for you to hop on over to Julie's blog for more inspiration.

Thanks for stopping by


My projects are being entered in the following challenges:

Bag Topper & Pillow Box


Craft-Dee BowZ Spring Blog Hop

Hi Everyone,
It's spring, finally, and welcome to the CDB Spring Blog Hop. If you hopped her from Brenda's blog then you are in the right place, otherwise you may want to start at the Craft-Dee BowZ blog to become eligible for the Craft-Dee BowZ prize of the great bow maker tool.

I hope you've been inspired so far and I thought since spring is here, at least that's what they keep saying, I thought butterflies and flowers would be in order.


I recently added an embossing folder to my collection, it has butterflies on it and I thought it fit the theme, perfectly. The stamped image is one for Northwoods. They always have beautiful images, don't they!! That background paper is so dreamy and its from Prima, its called Firefly. And the butterfly is also from Prima.

The bow maker tool is so easy to use and lets you go from bow challenged to a  bow making expert starting with your first bow. Small, easy to use and gives you the option of many different bow styles. I use this tool on almost every card I make.


Thanks for taking the time to join us for the first blog hop. Please remember to comment here on my blog and then leave one last comment over at the Craft-Dee BowZ blog  to be eligible for the prize.  We value all of your comments!!

Here are the design team members in case you get lost.

** Patti ** Amber ** Brenda ** Barbara (you are here) **

The winner will be announced on Saturday at the Craft-Dee BowZ blog, so check back there to see if you are the winner.

I am entering my creation in the following challenges


Thanks for participating in our blog hop. Have a great day.


Tuesday, April 2, 2013

Mother's Day

Hi Everyone
Mother's Day will be here in a few weeks so I thought I'd make a card with that theme in mind to share with you today.

I've used a patterned paper from Prima. It's in a 6"X6" pad named Firefly. I might have to get another. It's just yummy!!


I decided to stamp directly on this paper and I used a flower and the verse from great set from Our Daily Bread designs. It's called Mother's Day. Perfect for this card theme. I stamped the flower using a white and a purple & green embossing powder. BTW, the swirl on top of the paper is part of the actual paper design.


 Here is a view from the right side of the card.


Check out my bow in this close up. As I was deciding on the placement of everything on the card, I decided to try to make a bow that was lopsided on purpose. You know, the loops on one side are longer than the other. I also used 3 different ribbons on the card. Two different ribbons make up my lopsided bow and there are also 2 different ribbons layered down the front of the card panel.

If you are looking for a great bow making tool, then, you will love the tool I always use. It's from Craft-Dee BowZ. Easy to use and easy to take with you on crops etc.Click here to place your order.


Here is a close up view of those 2 embossed flowers. I actually was careful in using different EP colors on the purple flower. It worked out nicely.


I stamped the verse on a Spellbinders Ironworks Accents die cut piece of white cs. Those flowers were made using a My Favorite Things die, Rolled Mum. In making these flowers I decided to cut the petals in thirds, like you are cutting fringe. I liked the way this looks more than the way the die is designed with those larger petals.

Thanks for stopping in today, see you soon.