Pages

Wednesday, November 1, 2023

Mini Album Mania Challenge - November - My Christmas Mini album

WOW its November and I have some exciting news!!!

 I have joined the Mini Album Mania design team. I am so excited to be on this team and to share with you my albums. I hope to give you some ideas and inspiration. 


Here is a little info about the Mini Album Mania Challenge - Mini Album Mania is a mini album challenge blog and all types of handmade mini albums are welcomed. Since the albums should be "mini",  the size should be no more than 6" on any side, must have at least three pages (the more the merrier) and must be embellished/decorated. Photos are optional. The album can have any kind of binding such as rings, wire, ribbon, staples, glued tabs, etc. Or accordion or flap type with no binding. Just remember they must have at least three pages. No blank undecorated albums. This Mini Album Mania challenge runs November 1 thru December 15.

I love making albums and the one I am sharing with you today is one of my fav's and it's perfect for the upcoming holiday season. This album was hard to photograph so I apologize for the pic's, I wish they were better.

My album is 6"X6" which is my favorite size to make. 

This album has 6 pages and the way the pages are designed and folded, each page is like a Z. So there are really more that 6 page surfaces. Each page has one 6"X6" surface front and back and two 3"X6"  surfaces front and back. There are many pullouts and if you see ribbons in the pics, that means there is a pullout in that spot. So, there is plenty of room for photos and journaling.

Let me share with you my album 

Album front


Page 1 Front 

That white piece is a pullout It pulls out from page one's half page


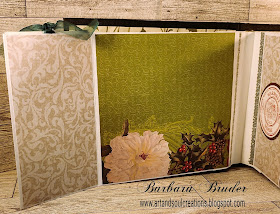
Behind the first half page is the 1st 6X6 page
 and it too has another half page to the right of the 6X6. 
All the half pages to the right of the 6X6 pages fold to the back of the 6X6
Also notice this half page has a pullout pulling from the top. 

Backside view of page 1

Page 2 
(I forgot to take  pic of page 2 half page)
This full page has another half page to the right of the 6X6
Also notice this half page has a pullout pulling from the top. 

Page 3 
Half page and pullout and a tag

Page 3 full page  
and it too has another half page to the right of the 6X6
Also notice this half page has a pullout pulling from the top. 


Page 4
Half page and pullout

Page 4  
The  full page  and it's half page to the right of the 6X6
It has a half page has a pullout pulling from the top. 
I added a tag to this page also


Back side of page 4

Page 5
Half page and pullout

Page 5 
The full page and it's half page to the right of the 6X6
Also notice this half page has a pullout pulling from the top. 
Added another tag to this page

backside of page 5

Page 6
Half page and pullout

Page 6 
The full page and it's half page to the right of the 6X6
Also notice this half page has a pullout pulling from the top. 


backside of page 6

Inside of album back

Can you just imagine all the Christmas/holiday photos and journaling you can add to this album. Family fun, kids opening up Santa's presents, oh the ideas are endless, LOL. 

In making this album I used various stamps and die cuts and a few 3-d nutcracker stickers. The designer papers were from a few different companies and worked great together. I even found lurking in my stash, some decorative brads that were perfect for this album. The ribbon is a sheer Christmas green ribbon.

Hope you enjoyed the photos and got some ideas.
We'd love to see your creation so submit your mini album in the Mini Album Challenge

Thanks for stopping in and I hope to see you soon

Thinking of You

Welcome to November!!!

Getting close to that 'bird day", or as most of us call it, Thanksgiving Day. (LOL). I can already smell the turkey baking away in my kitchen. Yum Yum

Well since its a new month its also the start of a new challenge over at  Birthstone Challenges. It starts today, (November 1). The challenge runs November 1 thru December 15.

The Birthstone Challenge is a color challenge blog, welcoming all types of handmade projects such as cards, scrapbook layouts, ATCs, mixed media, altered items, 3-D projects, etc. using the featured birthstone colors. 

There are two birthstone colors featured in each challenge and those colors must be the main colors seen in the gallery. You're required to use only one of the colors in each of your projects, however, you may use both if you want. A monochrome color pallet would be wonderful but not required. 

Here are the colors for the November/December challenge


I chose the color of turquoise to use on my project.


For my project I added a few die cuts to accent the magnolia branch that graces the card. Do real magnolias have turquoise colors in their petals? Not that I know of, but I took artistic license and used this beautiful color. Hope you like my color rendition,  That magnolia branch looks so pretty IMHO. 

Here is what I used to make my card:

  • Stamps used - Digital Image - Graciellie Design - Magnolia Branch; Clear Stamp - Rubbernecker Stamps - Organic set #3
  • Inks used - Ranger Distress Ink - Vintage Photo; Spectrum Noir Alcohol Ink Markers; Staedler Triplus Fineliner
  • Dies used - Rubbernecker - Crosshatch Design Die; Spellbinders - Kaleidoscope Strip
  • Cardstock - White CS, Turquoise CS, Cream colored CS

I am submitting my project in the following challenges:

Thanks for stopping in today and I will be back soon. Hope to see you then

With Heartfelt Sympathy

Welcome back to my blog.

And welcome to another month. Hmm, November, I am looking forward to turkey, are you?? It will be here before we know it.

And it's also time to welcome in a new challenge over at Love To Scrap. The challenge starts today (November 1)  and goes til December 15. Love To Scrap is a fun challenge blog and welcomes all types of scrapped projects - cards, scrapbook layouts, ATCs, mixed media, altered items, 3-D projects, etc. - using bits of new or leftover stuff.  And we all have leftover stuff don't we?? LOL

Well let me share my Design Team inspiration project with you. 


I needed to make some sympathy cards and thought I'd share this one with you. I used some older stamps and some scrap CS and DP.   No coloring, so this was quick and easy to put together. I mentioned I used some old stamps, I seem to never get rid of stamps, I just keep adding to my stash.  I have a treasure trove, LOL.  Maybe I need to thin the herd so to speak. (Nah!!)

Products I used:

CS - White CS, Dark Blue CS, DP
Ink - Memento - Tuxedo Black
Stamps - Stampendous - Flowers; MSE Sympathy Innie & Outies

I am submitting my project in the following challenges:

Thanks for stopping in today and I will be back soon. Hope to see you then

Let It Snow

Welcome to my blog and welcome to November. And WOW!!! Christmas is getting so close.  

I'll bet you still have presents to wrap and cards to make and get out. I know I do!!! I have some great ideas for you that will be a great time saver. But first...................

A  new challenge has begun over at the Merry Little Christmas Challenge Blog. The challenge runs November 1 thru December 15. Plenty of time for you to make a Christmas project and get it submitted it to the challenge. The Merry Little Christmas Challenge is an all-crafts Christmas challenge blog and welcomes any and all kinds of handmade Christmas creations all year long. 

Here's my time saver:
My project for this challenge is a 2'fer. I made a card and I made a bag topper to match. I love bag toppers and they are easy to make and really dress up a plain white gift bag. 

First I started out with a plain white gift bag (8X10).  I glued strips to the front of the bag. I embossed my strips but you can use left over CS or DP to add some additional beauty to the bag. Next I used an Accu-Cut die cut bag topper. I actually cut 2, one in white and one in blue CS and attached them off center. I embossed the blue CS one using a snowflake folder. I also used punched snowflakes to add additional interest to this topper. I added rhinestones to the center of the snowflakes and some glitter just to give the flakes more omph!!  I know you are saying you don't have one of those large dies to make the bag topper. Well I have a solution for you. Click on this link to check out how to make a topper with no bag topper die at all. It's easy peasy. 

OK lets go on the 2nd part of this project, the card.


The card is 5X7. The card base is white CS and the layered piece is DP. I cut a rectangle out on the left side of the card along with the DP. I embossed  a piece of vellum and put it between the card base and the DP. Next I added a silver frame. Lastly I added some punched snowflakes and put rhinestones in the centers, added some glitter and added the sentiment and that finished the card. 

These two, the card and the decorated bag, make a great duo for any gift.

Products I used:
CS used - White CS, DP, Silver CS, Light Blue CS
Ink used -  Momento - Paris Dusk
Misc used -MS Punch - Snowflakes, glitter
Dies used - Accu-Cut Bag Topper
Stamp used - Old sentiment

I am submitting my project to the following challenges:

Hope you enjoyed my creations. I am looking forward to seeing one of your Christmas projects in the challenge submissions.

Thanks it for now. See you soon,