Thursday, September 15, 2022

World Wide Open Design Team Challenge #09- Sept 15 2022

  It's time for the September challenge over at 


World Wide Open Design Team Challenge #09

September 15 2022  through October 12 2022

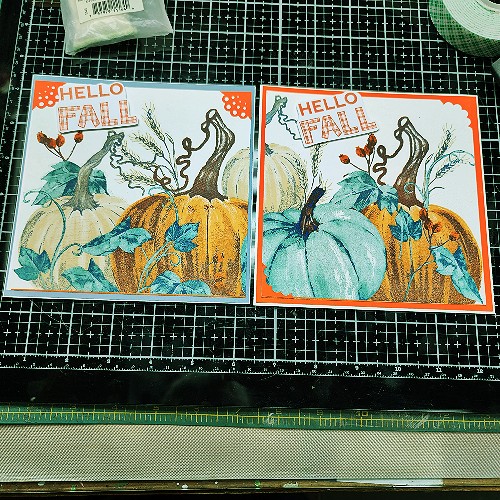
My DT Project is using 

Sweet Love


Come along and join in this great DT Challenge, opened to any DT in the World. 
To be eligible, you just have to be on any DT.

You can enter any image and any project.

Enter our Current Challenge HERE!

Our wonderful Sponsor for World Wide is the lovely  Julia Spiri.

Please support Julia Spiri and visit her Store HERE!

 Come along and join Julia Spiri's Facebook Group
"Stamps by Julia Spiri"
You can join Facebook Group HERE! 


Subscribe to Julia's You Tube  - Here 
Come along and Follow on Instagram. HERE!   Pinterest. HERE!  

SUPPLIES I USED ON MY PROJECT

Stamps: Digital - Julia Spiri - Sweet Love; Rubber Stamp - Heartfelt Creations Celebrate the season - Twisted Vines; sentiment - CandiStamps
Ink
Memento - Northern Pine, Rhubarb Stalk

Dies - Heartfelt Creations Celebrate the Season (Twisted Vine); Sizzix - Filmstrip (old)
Paper/Card StockWhite CS, DP, Red CS, Black CS
Accessories Spectrum Noir alcohol Markers; Outline stickers - Borders


I am submitting my card in the following challenges:

Thanks for stopping by today. I will be back soon

Monday, September 12, 2022

Another Napkin Card

 Hi Everyone,

I know I blogged about napkin cards a few posts ago. But I went shopping at The Dollar Tree and I found a package of napkins that are so pretty and perfect for the fall season we are now in. And these napkins just jumped into my basket!! And I just had to share the cards I made using this napkin with you all. If you missed my original post on how I made a napkin card you can read this post and follow along on how I make these cards. 


These napkins are just 2 ply, 14 to the pack and the size is 11.75" X 15.75".  Which is pretty big if you ask me. 


 Napkin opened up

I cut the napkin in half thru the center of the white space amd removed the bottom ply. 

I used a 12 X12 piece of white CS, cut it to a 6 X 12 and applied the glue to the CS, (My glue is blue when applied and turns clear when it is drying.


Next I gently laid the napkin down on the glued CS and patted the napkin down. I then gently smoothed the napkin and set it aside to dry.


After the drying period, I trimmed the piece down, cutting off the border on the botton and then trimmed the top as well. This left the mounted napkin about 5 3/4" high and about 11 3/4" across. 

Next I cut it in half so I could get two 6' x 6" cards out of this half of the napkin.


To finish, I added some colored layers to a 6" X 6"  card base and attached the napkin layer and added some decorative corners, and a sentiment and the 2 cards are done. 


OK, I promise that I won't do anymore napkin cards for a while, 
or if I do I won't go into detail on how I did it. LOL

SUPPLIES I USED ON MY PROJECT

Stamps: stamps - Hello - MFT - Thinking of You; Fall - Great Impressions
Paper/Card StockWhite CS, Gray CS, Orange CS
Ink: Memento - Morocco
Accessories: Paper Napkin, Glue Stick


I am submiting my project to the the following challenges:

Thanks for stopping in today and I will be back soon with another project. 
Nope it won't be a napkin card, promise.

Saturday, September 10, 2022

It's A Boy

 Hello everyone,

Thought I'd pop in and show a comissioned piece that I just finished and delivered.

It's a Baby Boy book.

It was pretty easy to make and the person who purchased it, just loved it. 

Let me share some photos of the book.

Here is the front cover


inside

The checkered piece you see in the above pic, is attached to the 6X6 page Its a half page and it folds to the back of that page, it holds a small long tag. To the right of the binding you will see a powder blue half page. It folds to the front of that 6X6 page. It too holds a long tag.The 6X6 page also holds a pull out as well, so there is lots of room to add pics and notes.

another page

This 6X6 book also has 3X6 pages on either side of the 6X6. I make these books with 6 pages and the book has a front and back covers, just like a regular book. I added decorative binding to each page and the covers and used my Cinch to bind it with binding wires. There is plenty of room for pics and notes and other rememberences and small memorabilia. I added white ribbon to the pull outs (tags) so its easy to spot and to pull out.

The DP I used is from a 12X12 pad that I purchased last year -  I think I bought it at Stampeddler Plus near Novi Michgan, at a great craft store. They had very unique items and I also picked up a pad for girls as well. 

I love making these books and as I mentioned they are easy to make (IMHO). Of course everything is easy when you know how, LOL. (That's what a lot of my friends tell me anyway.)


SUPPLIES I USED ON MY PROJECT

Paper/Card StockWhite CS, Blue CS, DP from Cavania (London) It's a Boy 12X12 paper pad
Accessories: WeR Memory Keepers Cinch Binding Tool, Cinch wires, Coin Envelopes, Catalog size (6X9) envelopes. Liquid Glue


I am submitting my project to the following challenges:

Well that's it for now. Hope you enjoyed my latest project and I will return soon with another project.

Thursday, September 1, 2022

Today Belongs to You

 Hello everyone,

WOW, Welcome to September. Sunflowers remind me of the fall season. So  I am back with a post for the Love To Scrap Challenge with a sunflower card. Hope you might check out the other designers projects, its a great place for some creative inspiration.

The project I made for Love to Scrap, comes from my fascination with paper napkins. Yep, paper napkins. I have friends that get those decorative napkins (some are like decorative paper towels) and have them in their guest bath to use to dry your hands off with. Well the napkin I used for my project really called out to me when I was at a friends house. And this napkin, when unfolded, had 6 images. (It was a pretty large napkin - it was 12 1/2" X 15 1/2") So I took one and cut it up which gave me 6 duplicate images and I was ready to make my 6 cards.

Here is the end result

Napkins can make the most beautiful cards.

Have you ever used a napkin on a card?? No?? well it is pretty easy (IMHO). Let me share with you how I do it.

   Here is the napkin opened up before I trimmed it.


  1.  Trim the napkin into the design you want to use on your card. Usually I cut the napkin on the folds.


   2.  Next, remove the layers, this napkin had 3 layers. 
    The 2 layers under the image - throw away as  you will not use them


  3. Cut a piece of white cardstock a little larger than the napkin piece you will be using. 
       Using white CS will allow the image colors to pop
  4.  Use a glue stick, cover the whole piece of card stock with the adhesive. 
       (Don't use liquid glue)

  5. Gently lay the napkin onto the glued up card stock. I usually pat it, to try to make a smooth surface.

  6. Smoothing the napkin - I use a business card to very lightly run the card over the napkin.
      Try to remove any spots that are not smoothed out. I generally will pat those spots.
      Now set aside to dry. Generally I do this in  the evening and let this part of the project, dry overnite.      
 7. After the project is dry I then trim away the excess card stock and attach it to a card front. 
      I  add glitter and add a sentiment and the card front is done.

On my project in the picture above, you will notice that I trimmed away the white background on the top part of the above image. I then added a gold piece of card stock to give some added interest to the card.

Here is another version but I left that white area on the top. 


Hope you liked this card and hope you try your hand at using paper napkins in your card making repertoire. 

SUPPLIES I USED ON MY PROJECT

Stamps: Clear stamp (sentiment) - Inkadinkado - Thoughts for the Day (OLD) 
Paper/Card Stock
White CS, Blue CS, Gold CS
Ink:VersaFine CLAIR - Morning Mist; Memento - Bamboo Leaves
Accessories: Decorative napkin; Glitter; Glue Stick; Outline Stickers for the side borders  


I am submitting my card in the following challenges:
Thanks for stopping in today

I will be back soon


Season's Greetings

 Welcome back. It's my 2nd post for the day. 

WOW do you believe it, September 1, already. That means fall is officially here in about 3 weeks and then Christmas will be roaring in soon after.

Speaking of Christmas, this project is for the Merry Little Christmas Challenge. Their blog is here and I sure hope you visit to check out the other DT's project. Great place for some Christmas inspiration. 

I have a lot of dies and other "stuff" that I have not used for a while. And the candles I used on this card are in that realm, along with quite a few other items.  LOL

Here is my finished project.


This was a fun and easy card to put together.

SUPPLIES I USED ON MY PROJECT

Stamps: Clear stamp - Woodware - Holly Spray (used the Sentiment only)
Paper/Card Stock
White CS, Gold CS, Green CS
Ink: Memento - Northern Pine
Dies Used: Heartfelt Creations - Regal Lattice Gateway; A Jillian Design - Stitched Sentiment Strips; Dee's Distinctively - Pine Sprigs, Candle Set
Accessories: Spectrum Noir alcohol Markers, Embossing Folder 


I am submitting my project in the following challenges:

Thanks for stopping in today

I will be back soon