Monday, January 1, 2024

Dream Big

 Whoo Hoo!!!  2024 has arrived, do you believe it!!  January is here  and 2023 just flew by. The first Birthstone Challenge for the year has started. Since birthstone colors don't change from one year to the next, an optional theme has ben added. The optional theme for this challenge is New Beginnings. (New job, new home, new baby etc). The birthstone colors are still. 


Click here to check out the optional themes for the remainder of the year. 

With the theme of New Beginnings I immediately thought of a new baby. 


And I used the amethyst color (its my birthstone color) This card was so much fun to make. Hope you enjoy it. 

Supplies I used:
Stamps - My Sentiments Exactly - Baby Caps (Old set) 
Dies - Spellbinders - ovals; Impression Obsession - Baby Bib and Onesie; Sentiment - unknown
CS - White CS, Purple CS, DP
Ink - Memento 
Miscellaneous - Heart Shaped paper clip, Purple Glitter

I hope to see a project that you submit in the Birthstone Challenges

Thanks for stopping in today and I will be back soon. 

Have a Nice Day

Hello and welcome to 2024.

It's time for the first challenge of the year at Love To Scrap Challenge. For this challenge I usually go thru all my leftover bits and pieces that weren't quite right for other projects and use them on a card/project that I make for the Love To Scrap Challenge.

For me, its fun as I go thru a whole bunch of stuff I have saved and come up with a card to share with you all. 

That big pink oval was calling to me and then I spied a smaller oval cut from DP in the pink family and it worked well with the large oval. The stamped bird had a pinkish colored flower and that seemed to fit with the pink colors I was looking at and then I spied a fence just waiting for something to sit on it. My background DP has pink in it, so, it all works well together (IMHO)


Well if you are like me, you save lots of things. So go thru them and make a card. and submit it here at the Love To Scrap Challenge. I know I'd love to see what you have made. 

Thanks so much for stopping in today to see my project!!

I will be back soon

T'was The Night Before Christmas

 Hi Everyone, 

Welcome to 2024 !!!!!!  Hope your Christmas was a great one. I know Christmas is over but I am always looking for something for the next Christmas challenge over at the Merry Little Christmas Challenge blog. And the Merry Little Christmas challenges are always Christmas themed so if you like to make Christmas cards all year long, this challenge is right up your alley. The January/February challenge has begun so, let me share with you my card for this challenge.  

Different looking cards always catch my eye and this one sure did. Easy to do. My mom always added....." if you know how." LOL 

Here is the front view


Here is a side view


I seem to gravitate  to fun fold cards, and this card is no exception. When folded flat, it easily fits into a 5X7 envie.

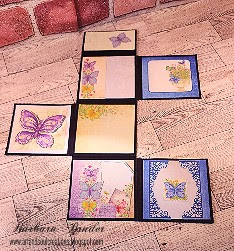
Below are pic's showing another card (in blue) I made this card and took pic's in case you want to follow along as I show you how to cut and assemble the card.
The card base is 7X7 - scored at 1 1/2" and 3"
Add your layers to these 3 sections. (I know you are able to figure what your layer sizes should be, so I won't address those sizes.)

Cut and attach the layer pieces to the card base.

Next you will need 3 strips and they are  8" X 1.25 " scored at 1.5" and 3" (scored on the long side). Cut and add your layers to the strips. 


Attach the first strip to the top far right side of the card. Glue the far right scored area of the strip, lining it up with the far right edge of the card. After attaching the top strip, attach the bottom strip next  and then attach the center strip. Doing it this way gives you the ability to center that middle strip. You want to make sure that the strips are just attached to the far right of the card base. 

 Flip all 3 strips all the way to the right, as shown above, close the card, folding the left side flap down and 

then that small scored area back on to itself (on the card base) so the card will look as if its closed. 
Now flip those strip areas that are not glued down, flipping them over on top of the folded card front. Just glue the area that the strip is touching. Do this to all 3 of the strips.

Next 

The stamped image base is 3X5 with a layered colored CS 
and then the stamped image is on a 2 5/8 X 3 7/8 layer.

 When attaching the image base to the card, make sure you only add adhesive  in the middle, the top and bottom of the stamped image base otherwise the card will not open.


This card will fit in a 5X7 envie

This card makes a statement as it is pulled from the envie. (IMHO) and the card stands up on its own as well. 
Since this card does not open like a conventional card, you will want to add the sentiment and any personal message that you normally put inside the card, add that to the back of the card.

Hope you were able to follow along.

Supplies I used:
Stamp - Verses (wood mounted) Santa - old and still available. (This is my all time favorite Santa stamp)
Ink - Memento  Black
Paper - White CS, Red CS, DP 
Sentiment (on red card)- From my computer 

This card design will lend itself to any season so I hope you will try it out I think you will like making it. 
Thanks for stopping in and I look forward to seeing one of your cards in the Christmas challenge.

I will be back soon.

Butterflies - Mini Album Mania

Happy New Year!!! and welcome to 2024 and it's time for the Mini Album Mania challenge

I decided to make a small (mini) album and for me this is really small.(LOL) I usually make 6"X 6" or larger albums so this was an interesting project (size wise) to say the least! LOL

This mini album was really easy to make and after I made the base, I wondered what to use for the theme. Since I have made lots of Christmas cards for my consignment places, I decided on a different theme..... butterflies. I am rushing spring, hahaha.

Let me share my project pics.

This mini album (folded) is 3 1/2 X 3 1/2
I added a belly band and added
a pretty butterfly to it as a focal point


The mini with the belly band removed


The mini fully opened


The mini fully opened but
 flipped over to show other side


There are spots for small tags and some journaling and small pics in each of the squares.

All the DP's are from the Heartfelt Creations Floral Butterfly Collection

For the base, I used one 12 X 12 sheet of black CS
Each square is 3 1/2  and I added a 1/4" between the squares to accommodate 
the folded squares and a few added items.

Hope you enjoyed this and hope you have a Happy New Year.

I will see you soon