Friday, September 1, 2023

A Blooming Hello

Hello and welcome to my blog. 

It's September 1 and fall will be here soon. And I want to know, just where does all the time go!!! I keep looking for it but I never find it. LOL Speaking of time..........

It's time for the new challenge over at Love To Scrap. The challenge starts today (September 1)  and goes til October 15. Love To Scrap is a fun challenge blog and welcomes all types of scrapped projects - cards, scrapbook layouts, ATCs, mixed media, altered items, 3-D projects, etc. - using bits of new or leftover stuff.  And we all have leftover stuff don't we?? LOL

Well let me share my Design Team inspiration project with you. 


I haven't made a side stair step card in eons so I pulled out my die and cut the base. Next I added a pretty image from Polkadoodles and added some more of that same image in the steps area of the card. Added more color to the flowers using spectrum Noir Alcohol markers.

I also mounted a butterfly to a strip of acetate and attached it so it looks like its hovering.

Here is somewhat of a side view.


Here is what I used to make my card:

  • Stamps used - Digital Image and Sentiment - Polkadoodles - Flower Meadows collection 
  • Inks used - Memento Ink - Northern Pine: Spectrum Noir Alcohol Ink Markers
  • Die used - Card Base - Accu-Cut die - A7- Step Card
  • Cardstock - White CS

Well I hope you enjoyed this card. I would love to see one of your cards in the challenge. Thanks much for stopping by, see ya soon.

Merry Christmas

Hello and welcome to September 1.

WOW!!  Autumn begins later this month and you know what that means -  Halloween, Thanksgiving and Christmas aren't far behind.

Well a  new challenge has begun over at the Merry Little Christmas Challenge Blog. The challenge runs September 1 thru October15. Plenty of time for you to make a Christmas project and get it submitted it to the challenge. The Merry Little Christmas Challenge is an all-crafts Christmas challenge blog and welcomes any and all kinds of handmade Christmas creations all year long. 

I love Christmas and making cards for that season is really a joy, especially if you are not in a rush. So, the more Christmas cards I make now, the fewer I will need to make at Christmastime. (LOL) 

I thought I'd share a card that I presented in a class I taught at Stampaway this year.  I used circles and ovals in the class and today I'm sharing a card I have made using ovals.  Since oval shapes are not symmetrical you can cut an oval longways thru the center or across the center shortways. 

If you use one small, one medium and one large oval shapes, use 3 different colors cutting them in half and placing them in a specific order you will get  2  very interesting shape designs. I am showing the two cards I made using 1 set of ovals. (6 ovals total)

Both of these cards have used the ovals cut longways 

Card #1


Here is the other card using the left over oval halves. By placing the oval halves differently you will get a different look. The placement of ovals in card one looks more like an oval shape, but the ovals in card 2 look more elongated. 
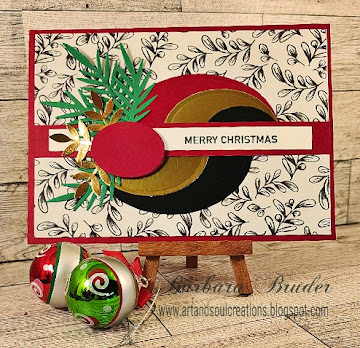

Card #2 lines up the gold pieces giving that elongated look.
Since the ovals are cut in half, a strip is layered over the where the oval halves meet, to give a finished look. And that is a perfect place for a sentiment. 

I used green pine sprigs and gold leaves to give these cards a Christmas feel. 

These cards are perfect for quick Christmas cards and the great thing is that you will get 2 cards with somewhat different looks from the 1 set of ovals that are cut in half.

Products I used:
Stamps used -Woodware - Christmas Strips - Sentiment
CS used - Red,  Gold, Black, Green CS,  DP
Ink used -  VersaFine - Nocturne
Misc used -MS Punch - Branch 2
Dies used - Pine Sprigs; Ovals (3 graduated sizes)

Hope you enjoyed my creation. I am looking forward to seeing one of your Christmas projects in the challenge submissions.

Thanks it for now. See you soon,

Have a Great Day

 WOW, can you believe it!! We've just started a new month. And that means there's a new Birthstone Challenges starting today, (September 1). The challenge runs September 1 thru October 15.

The Birthstone Challenge is a color challenge blog, welcoming all types of handmade projects such as cards, scrapbook layouts, ATCs, mixed media, altered items, 3-D projects, etc. using the featured birthstone colors. 

There are two birthstone colors featured in each challenge and those colors must be the main colors seen in the gallery. You're required to use only one of the colors in each of your projects, however, you may use both if you want. A monochrome color pallet would be wonderful but not required. 

Here are the colors for the September/October challenge


For my project I decided to use the Sapphire color and I thought my card would be perfect to send to someone for any reason. It's always nice to receive a card for "just because."


I used ovals and as I placed them on the card, it kind of reminded me of fish scales. Hmmm,  maybe I should have used some fish images instead of flowers. LOL

This card is easy to assemble and I love that layered and somewhat different look those ovals give off. I love using flowers and dug thru my die collection, using an older flower die set to accent the card. I'm sure that you have some beautiful flowers or something else that will be a beautiful accent on the card you make. Hope you like my inspiration and hope it gives you some ideas.

Products I have used:

Paper usedWhite CS,DP (background) - Heartfelt Creations, Sapphire Blue CS, Blue Pearl CS
Misc usedWhite Flatback Pearls, Spectrum Noir Alcohol Ink TB8 (used to color the pearls), Embossing Folder, Oval Punch
Stamps usedStamped sentiment - Hero Arts (old)
Dies usedFlowers - Elizabeth Crafts - Victorian flower set 1, Victorian Flower overlay Set 1
Leaves - Heartfelt Creations - Leafy Accents

Thanks for stopping in today and I will be back soon. Hope to see you then

Sunday, August 27, 2023

Happy Birthday

Hi Everyone

Back with a quick post.

Have you ever made a card and liked it but felt it needed more?? Well this card has sat on my work spot for a l-o-n-g time because I felt it needed more. I am sorry for not taking a pic before I added the changes . I just couldn't come up with the better look, til now. Well I finally decided to make some changes to give it more umph. LOL

Here is the card now. This pretty much looks like it did before the changes(additions) to the card. Those changes/additions that I made were applied to the card  after it is opened, not the card front.


When you open the card this is what you see.

Originally when the card is opened, the triangle (with the HB sentiment on it) was just the pretty dark DP.  And that triangle on the base of the card was not there. It was just that floral DP. 

Here is a closer view of the card opened


So I added a partial oval to the small triangle. I decided it was a perfect spot for that the Happy Birthday sentiment. And as the card was open I thought that big space (where the larger triangle is now) was just a wasted spot. I know there is plenty of room on card back, but that spot was begging for something. 

So I added a sentiment to another larger triangle. Added a few layers and borders and attached it to the inside card back. So as the card is delivered the insides hold a wonderful surprise.

Hope you enjoy my card today.

Have a great rest of your Sunday.